HRUweb Tutorial
(→1 Uploading Input Data) |
(→1 Uploading Input Data) |
||
| Line 70: | Line 70: | ||
[[File:upload_done.png]] | [[File:upload_done.png]] | ||
| − | + | The uploaded overlays can be edited in overview in the top left. By rightclicking on the overlays, | |
| + | the layer can either be zoomed or removed. The gauge is shown as blue dot. | ||
[[File:zoom_layer.png]] | [[File:zoom_layer.png]] | ||
Revision as of 10:46, 14 March 2017
- general description & aims -
- bases on GRASS - written in Python
+ Content
Starting WebHRU Tool
Link to HRU Tool: [[1]]
- Layer, GRASS HRU Map, Data process log, Data upload, Data browser
1 Uploading Input Data
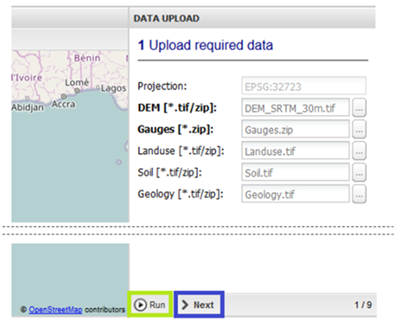
At first, decide which map source should be used as the base layer (default: OpenStreetMap):
Then, upload the required input data for HRU delineation.
At least, DEM and Gauges are required.
| Input data | Description | Format |
|---|---|---|
| DEM | Raster of Digital Elevation Model | Tiff (.tif) or .zip-file |
| Gauges | Layer of gauging stations | .zip-file |
| Landuse | Raster of landuse | Tiff (.tif) or .zip-file |
| Soil | Raster of soil | Tiff (.tif) or .zip-file |
| Geology | Raster of geology | Tiff (.tif) or .zip-file |
The projection will be set automatically on the basis of the input data.
For starting the uploading process, click 'Run'.
The uploading process is shown in the Server Processing Log:
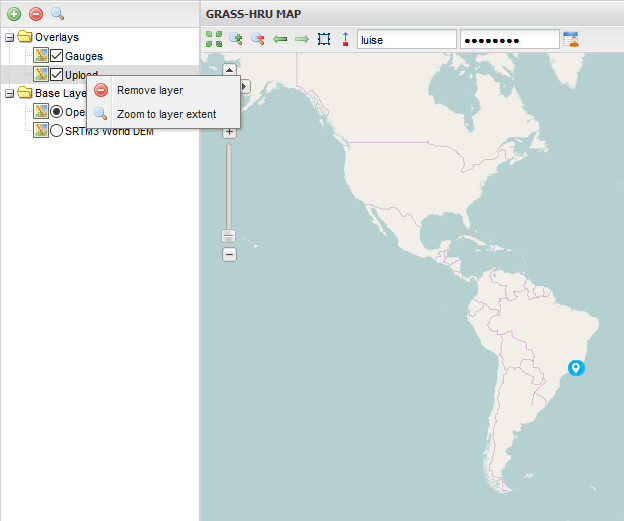
The uploaded overlays can be edited in overview in the top left. By rightclicking on the overlays, the layer can either be zoomed or removed. The gauge is shown as blue dot.
When finished, click 'Next'.
2 Data Setup
Zoom to your region of interest in the map by clicking on the 'Gauges Layer' and on the magnifier.
Choose a subregion by drawing a box around including the gauging stations (blue).
The drawn box must not exceed the extend of the given box (red). BILD
For clipping your region of interest, click 'Run'. When finished, click'Next'.


