OBIS: Edit Geodata
For the import and edition of geodata you will be automatically redirected to the JanusWeb. Click "New Import" in the menu on the left side and you will be led to the JanusWeb GUI. If you cannot access this site please make sure that you are logged in and that you have required rights for the import of data.
Contents |
Geodata import
For data import you have to select the format of the geodata with the help of the pull down menu. The formats ESRI Shape file, TIFF and GeoTIFF, CSV and Dbf (dBase format) can be imported. The import process cannot be executed if you try to upload an unidentified format.
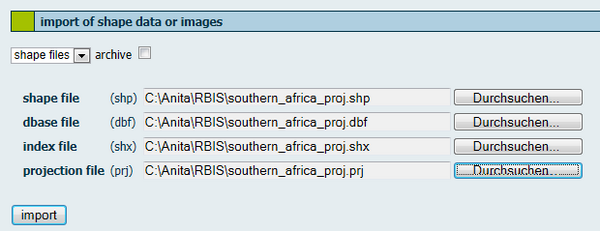
Import of shape data or images
You have two possibilities to upload data:
- You need to give the path to each single file. E.g. if you want to import a shape file you need to select the shape file (shp), dbase file (dbf), index file (shx) and optionally the projection file (prj). Because of safety measures filling fields automatically is not allowed.
- Tick the box if you want to upload data from the archive. The archive already contains all associated data. The following archives are supported:
- Zip archives with the extension .zip
- Tape archives with the extension .rar
- Compressed tape archives with the extension .tgz or .tar.gz
Enter the path of the archive or of the single shape files in the corresponding entry fields. The button "search" opens a helpful browser. Then click on the button "import".
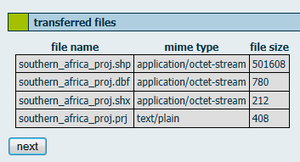
The data were sent to JanusWeb and listed after transferred successfully.
For a correct illustration or conversion of the vector data information about the projection need to be given in Spatial Reference Identifier (SRID) form. For shape files such a SRID is either generated automatically from a provided projection file (.prj) - if this file is provided- or needs to be selected from a list. You get a detailed description of the selected SRID when you click on "information". You can enter the projection ID in the menu "determining SRID" with the help of the pull down menu.
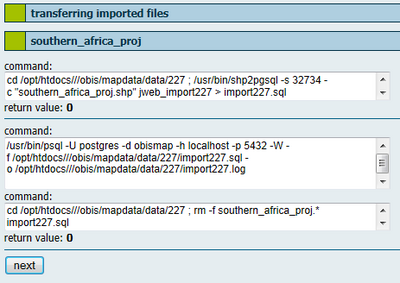
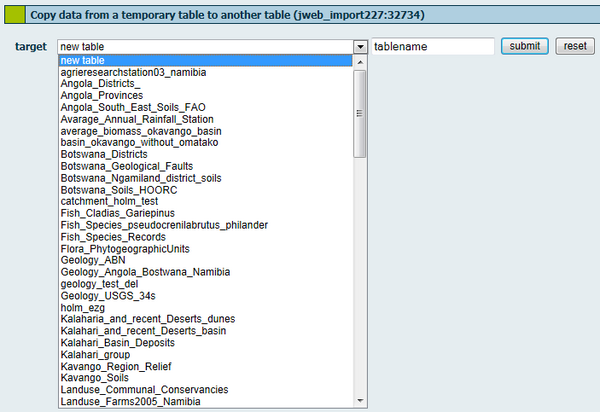
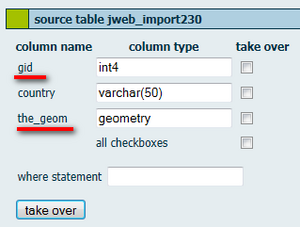
In a next step data were imported into an import table. This temporal table contains the geometries and attributes of the shape file. On the next page you will get informed about the steps carried out and corresponding results. For bigger datasets it may take a time until the results are shown as the output will be generated after data have been imported. In a next step you need to decide either if you want to create a new table, overwrite an existing table or attach data to an existing table. If you want to create a new table select the first item of the pull down menu and enter the name of the table into the entry field. In case that a table with this name already exists, an error message appears. If you select an already existing table, another pull down menu opens. In this menu you can determine whether data shall be attached to the table or shall be substituted. If you overwrite an existing table, the existing table from the database and the entry from the PostGIS management table will be deleted. Afterwards the procedure is the same as for a new table. In case you want to add data to an existing table two new columns were added to the existing attributes. The attribute "gid" is a new artificial primary key, which is used to identify objects within the system. The attribute "the_geom" contains the geometry of the object. For a correct application both columns need to be taken over as a geometric table.
Create new table
Select "new table" in the pull down menu, give a table name and click on "submit". A new table appears.
Next to the attribute columns, geometric data as the column "the_geom" and an object_ID are added. In the entry field "where statement" you can determine a statement, which must be set up in the SQL-syntax without a leading WHERE-key word. Consequently, the import is restricted to the data that fullfill this condition.
If all information are given, the following steps can be accomplished:
- creating a new table
- copying data from the import table to the target table
- updating PostGIS information
- entering authorizations for the target table
- setting up a spatial index for the target table
Use existing table
In case you want to add data to an existing table the import has to be carried out as described, but then imported data were added to an existing table. For this purpose you need to give an allocation of the already existing data. If you select an already existing table, a new pull down menu opens and you get the possibility to add, rewrite or update data.
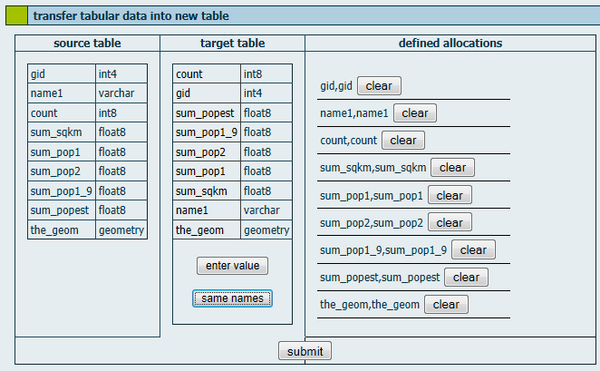
Adding data means to add rows to existing tables, new columns cannot be added. Contrary the function rewrite overwrites the existing data rows by deleting the old table and setting up a new one. You have to allocate existing columns to the just imported columns. First, select a column of the target table by clicking on the column name. Then, you either select a column from the source table or use the button "enter value" in order to enter a constant into this column. This procedure can be used to combine several datasets, which have been seperated so far, in one table and later classify them on the basis of this column. Another possibility is the automatic allocation of same column names. Click on the button "same names" to generate an automatic allocation, which is displayed on the right side. All allocations are displayed on the right side and can be deleted when you click on the "clear" button. The form assures that each column of the target table occurs only once in the allocations. Note that the gid column is not taken over when you add data. This column is set up as a number in the table and is filled automatically by the database. When you add data, gid always starts with "a"; otherwise, there would be a double primary key.
Bulk import
Via mass import of shape files you can import archives, which contain several shape files. For this pupose, you do not need to give each single shx, dbf and shp file. Enter the path of the archive in the import menu. Then OBIS/ JanusWeb lists all data contained in the archive. You do not need to take over all shape files of the archive. In fact, it is possible to select shape files in the section "data and parameter settings". You need to enter the SRID for each shape file you wish to import. If the SRID is missing, OBIS sets the value to -1, i.e. unknown. Note: SRIDs cannot be changed at a later stage, which is why you need to enter the correct SRID right from the beginning. To name the tables there is an option available to assign a prefix. This prefix is put in front of the table names automatically. Unlike the import of csv or dbase table data you cannot overwrite existing tables. If a table with the same name exists, the import will be cancelled. If necessary, you need to delete the existing table beforehand in order to import a new table of the same name. To finish the import click "next".
Import of CSV files
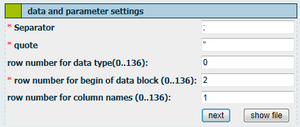
Apart from vector data and raster data you can also import table data in form of dbase and CSV files. As an example, the import of CSV files is important for the integration of GPS data in the database. Select the CSV format in the pull down menu. You can import a single file or an archive. Variables in CSV files are separated by punctuation, e.g. semicolon or comma - the same separator has to be used within the entire file. If the separator is part of a data element, it needs to be written in quotes. OBIS/ JanusWeb has to be informed about the type of separators and quotation marks used for the imported file. For this purpose please use the section "data and parameter settings". Apart from separators and quotation marks you need to give the row number for the beginning of the data block and (optionally) the row number for the data type and the column name.
The first row of CSV files contains the column names. Consequently, RBIS/JanusWeb takes the columnn name of the file’s first row by default and assigns it to the header of the new table. However, if you wish to change anything here, you can use the fields row number for column name. In any case, the first row of your CSV file is not assigned to your table as data entry. If the file that has to be imported does not show columnn names but data in the first row, you should enter columnn names with the help of the editor before you start the import. Otherwise, these data would not be assigned in the data table by OBIS/JannusWeb. The fields from top to bottom, which can be found under column name, refer to the columns from left to right in the source file, i.e. the left column can be found in first place, the outermmost right column can be found in last place. Note: Column names have to consist of at least three signs, otherwise no import will be carried out. You need to declare the column name as well as the data type. For this purpose, PostgreSQL specification of data types is used. The data type needs to be entered manually. Furthermore, in the matrix you can specify whether the corresponding column contains northings or eastings. If the CSV file does not only contain attributes but also information about the geometry, you need to give the type of geometry (POINT, LINE or LINETONEXT) and SRID.
The uploaded data will be saved in a temporal table by OBIS/ JanusWeb. There you can see whether errors have occurred when the SQL table has been generated, e.g. because of missing information about the data type or because you have entered not enough signs for the column name. If an error occurs, the import process will be cancelled.
OBIS/JanusWeb generates a new data table by means of PostgreSQL. Data from the temporal table will be inserted in the new table. You can also attach data from the imported file to an existing table or overwrite data. When you create a new table you will be led to the source table. If you wish to attach or enter new data, you will be taken to the section "transfer tabular data into new table". Here you can enter data from an imported file into an already existing table. The column names and the data types of the existing table (here: target table) as well as the imported, temporal table (here: source table) are listed. If you chose "same names", data from columns of the same name are overwritten automatically. Columns with different names can be allocated manually. For this purpose, select a column of the target table by clicking on it and then click on the column of the source table. See section Use existing table. When you click "submit", the import has been finalized and you are led to the section "transfer data to table" where you can view the set up allocations. Data from the temporal table is copied into a database table. Before this table is finally integrated in the database you can correct the information about the data types and select the columns you wish to take over.
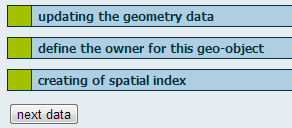
Here you can correct data types under the headline "column type" and tick the checkboxes for the columns of the source table that shall be taken over to the target table. Complete the import process by clicking "take over". Finally, the importer will be set up as the owner of the table. The button "next dataset" is only relevant for bulk imports.
Import of dbase data
Select the format dbase in the pull down menu. Attributes in dbf format can be imported individually or as an archive. After clicking on the button "import" the files were uploaded to the server. Then imported data were displayed on the screen. In the next steps you need to create a new table or make use of an existing table as described before.
Edit map
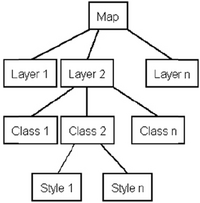
OBIS/JanusWeb uses UMN MapServer to display and create maps. MapServer is an Open Source platform for publishing spatial data and interactive mapping applications to the web. OBIS/JanusWeb creates a mapfile to each map. In this file the structure, appearance and data basis of the maps are displayed. The structure of such a mapfile can be illustrated by a tree diagram.
Each map consists of at least one layer, which again consists at least of one class. The branching points are called sections or nodes. You can set further nodes and attribute values for each node. You can also implement and illustrate the following map elements as nodes with MapServer: legend, reference map, scale and layer overview.
In order to edit or view existing maps, the user needs to have the necessary authorization. Only then the menu item "edit map" with which you can edit and create maps is available in the main menu of OBIS/JanusWeb.
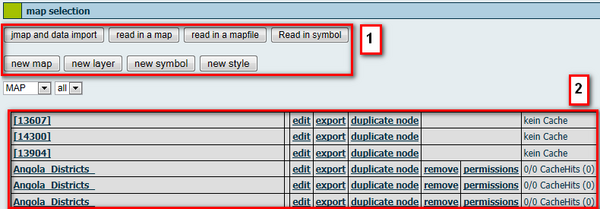
 With a click on "edit map" the following screen appears.
- "jmap and data import" imports existing maps in Jmap format as well as corresponding attributes, "read in a map" imports maps in Jmap format, "read in a mapfile" reads in mapfiles into map selection, "Read in symbol" initiates that symbol nodes are read in as mapfile into the selection. Note: All import processes are carried out via specific directories in which data needs to be copied beforehand. A simple upload of mapfiles is not implemented. "new map" opens a map form for a map node, "new layer" opens a map form for layer nodes, "new symbol" opens a map form for symbol nodes, "new style" opens a map form for style nodes.
- You can switch between existing layers and maps with the help of the buttons in the pull down menu. If you click on one of the buttons, the existing layers or maps will be displayed. In addition to map names or layer names there are options for changes, deletions, exports and authorizations available. If you wish to delete a map (or any other node), you need to click on "remove". Note: You are not asked again whether you really want to delete it. After deletion the page is loading again automatically and displays still existing layers. If you wish to edit a map, click the button "edit" next to the corresponding map. When you click the button "permissions" you can view the current users with authorizations for this map. The "export" button generates a tar-gzip archive with a Jmap file and the corresponding data of the node for download. The function "duplicate node" generates another identical node. Thereby you can create several similar nodes quickly and easy.
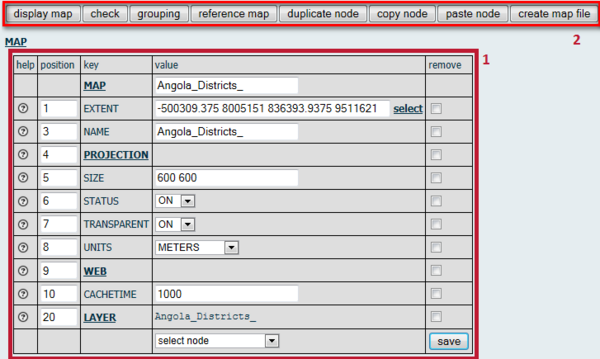
When you click on the button "edit" in the row of the dataset you are interested in, the node form will appear:
Node form
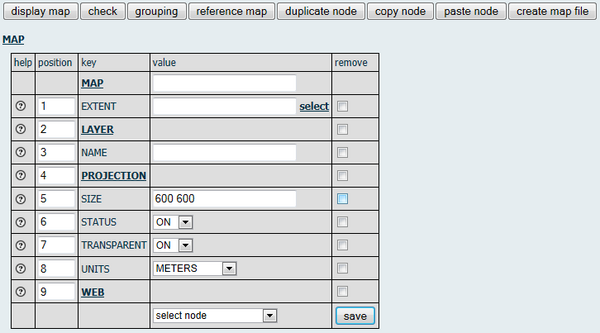
The UMN MapServer needs a mapfile with determined map elements, layout and contents to generate a map. The mapfile can be created with the help of a text editor. In JanusSuite user-optimized HTML forms are used. Each node (also called section) in the tree diagram of the mapfile can be described via a form. In the same menu you can create and edit existing files. For new maps the form will be empty, for already existing maps the form will be filled. When you click "new map" a menu and form without a name but several entry fields will appear. The menu is organized in two sections. On the lower half there is the part where you can edit nodes, on the upper half there are the map functions which work for all nodes. Map functions are: "display map", "check", "grouping", "reference-map", "duplicate map", "copy node", "paste node" and "create mapfile". A form for editing nodes of a mapfile is shown below.
- You see a list of elements/keys with entry fields needed to be filled. For each element a help button is available, which gives hints for filling out the fields, e.g. the help notice for the field EXTENT: "In order to create a map, the mapserver needs the information from which area data shall be displayed. The entry here in this field provides the initial value. You can use the extent overview, for selecting a current extent. In doing so pay attention that the selected extent will match the map projection". You can usually enter the values of the parameters manually. However, for some parameters you can select the values via links ("select") or from a pull down menu. Both options can be found in the column "value". The entry fields in the column "position" serve to set a hierarchy of the rows and therefore of the keys. Just enter the desired position number. By default the key MAP should be at first place in the menu. This key identifies under which name the map you wish to edit is listed in the database. Furthermore, this key is meant to be the root of all other nodes. As a user you may learn very quickly about the importance to save your entries. If you leave the form without saving your entries all entries will be lost. For this reason you are adviced to save your entries after each edition. With the help of the button "save" rows and entries can also be deleted. For this purpose, you need to tick the rows you wish to delete in the column "remove" and then save the form.
- Above the section where you can edit parameters there is a menu for map functions. Contrary to the node forms these functions refer to the entire map, i.e. to all nodes. Map functions are:
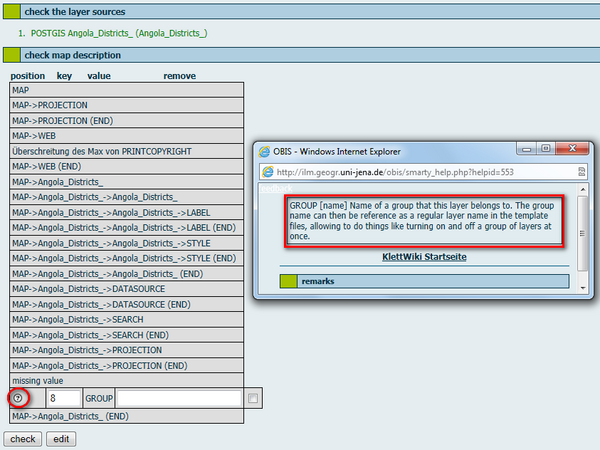
- "check" The button serves to check whether your entries for the map are correct or not. Your entries are checked and you are informed if there are mistakes or gaps in your description of the map. After clicking the button "check" a new table appears. In the first row you can view the results of the check of the layer data sources. A green field signals a correct entry. If not all layer sources have been selected, a red field appears. Moreover, the map description, i.e. the definition of nodes and sections, is checked. In case of discrepancies and wrong information an entry field will open below the corresponding parameter where you can edit or correct your entries or remove the parameter. The example shows a missing value for the key GROUP. By clicking on the question mark you can see what this key means and how the empty entry field can be filled. Finally click "check" to save your editions. Via "edit" you are led to the latest edited form menu. If no error occurs, you can generate the mapfile. Just click "create Mapfile" in the menu of the map functions. Then OBIS/ JanusWeb creates a new mapfile.
- "grouping layers" Navigation within a map, consisting of several layers can be laborious, e.g. if each layer needs to be ticked individually. Therefore it is possible to group layers and call them up via the group, then. However, you can still tick individual layers. Click "grouping" and a list of all layers of the mapfile appears. For each layer you can enter a name of a group. In order to create a group of two or more layers just give them the same group name. Close the menu by clicking "save". After you have created a mapfile (click "create mapfile") the group will be displayed.
- "display map" To view your generated map click "display map".
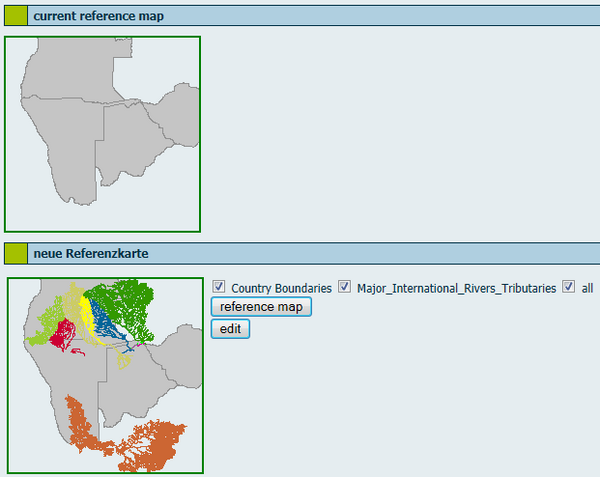
- "reference map" To get a better overview it is useful to generate a reference map. This reference map can be edited and adapted with the help of the menu item "reference map" and with the parameter reference (placed in the map section). OBIS/JanusWeb creates such a reference map even if you do not give any further information for this map. Automatically, a reference map will be created from the main map's existing layers when you call up a map's view for the first time. If new layers were added to the main map or if layouts of layers were changed by the map editor, the reference map is not edited automatically. For this purpose exists an extra module with which you can create new reference maps at any time. This module is retrievable via the map function of the reference map. The current reference map of your map is displayed on the following page. There you find a row of checkboxes with the names of all layers that refer to the main map. You can add or remove the layers of the reference map by clicking on the corresponding checkboxes. In the lower part of the page you find the reference map that shall be generated. By clicking the button "reference map" you save the lower map as new reference map; by clicking "edit" you will be led back to the map editor. The latter takes you back to the form which you left when you clicked "reference map". The difference between the key "reference" and the menu of the reference map is that for the first an image file is loaded whereas for the latter an interactive map is loaded. If there is an entry for the key "reference" in your mapfile and you want to create a new map, you need to delete the "reference" entry from the mapfile first (i.e. delete it from the form) and then create the mapfile again. Only then you can create a new reference map. If you do not delete the entry, MapServer will send an error message and cancel the creation of the reference map.
- create map file: After filling out the forms OBIS/JanusWeb has to generate a mapfile for the MapServer from the map description first. Do not wonder about this important step being carried out unspectacularly without displaying any overview of results. First when you display the map it is possible to see whether your mapfile works without any errors. If MapServer cannot display your map an error message will occur.
- duplicate node: The current visible node will be duplicated. This is especially useful when you wish to use nearly identical nodes. The new node appears in the map description as sibling root and has the same features. Of course, duplication does not make sense for all nodes. Occasionally, heavy mistakes can occur, e.g. for data source nodes or projection nodes. However, this function is very useful for classes and layers. You can create numerous layers quickly.
Generate a new map
You can generate a new map by clicking on the respective button. When you create a new map, keys (in UMN MapServer parameters are called keys) like MAP, EXTENT, LAYER, NAME, SIZE and STATUS are displayed by default. Further keys can be selected and added via the pull down menu. Here you can give a title to the map, define the projection and select layers. Further you can define the extent, size, status on or off, transparency and units. You also have to set a cachetime. You do not need to declare all parameters. Nearly all parameters are reset to default values. If you add parameters to the form with help of the selection menu, you need to set the corresponding parameter. Usually an error message occurs when the declaration is missing. Thereupon the map creation is cancelled. For single keys there is an online help available. There you can find valuable hints. Just click on the question mark in the respective row.
Edit data
For getting an overview of the existing data tables click on the subitem "view data" of the menu item "edit data".
 With a click on "view data" the following screen appears.
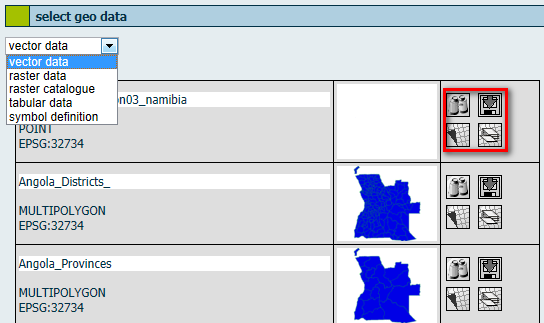
You are led to the menu "select geo data" which is the main menu for the export of data. In the pull down menu on the top of the table you can switch between data types, e.g. raster data. You can view those data formats which can be imported as well as symbol definitions as can be set in the menu "edit map":
- Vector data
- Raster data
- Tabular data
- Symbol data
- Raster catalogs
The first column in the overview table gives metadata information such like title of dataset, type and ESPG code. Vector data were distinguished according POINT, LINESTRING or POLYGON geometries. Additionally, all of these versions are available with the prefix MULTI. In the second column you get a preview for raster and vector data. In the third column you find four icons representing different functions:
-
 "preview" displays a preview of data in a new window (not available for table data and symbol definition). The minimal/maximal X and Y values are displayed next to the map.
-
 "download" to export data. You will see an overview of columns of the selected table. Mark those columns that you wish to export. With help of the "where statement" columns can be filtered. Furthermore, the selection of exported data can be limited by a "where statement". For this purpose, enter your statement for the "where statement" (SQL synthax) in the entry field. After entering all information click "take over". OBIS/ JanusWeb deletes the still existing files in the download directory and in case of vector data converts the selected data into shape data. These data were saved in an archive, packed and then put into the directory which has been deleted before. All these processes can be monitored in an overview by the user. Use the link "download archive" at the lower section of the overview.
-
 "generate new map from this data". Use the icon to generate a mapfile. However, this mapfile contains only one single layer- the one of the selected data. For further information about how to create a map, see the chapter Edit map.
-
 "add data as layer to an existing map". The icon leads you to the menu in which you can select a mapfile to which you wish to add nodes.
